

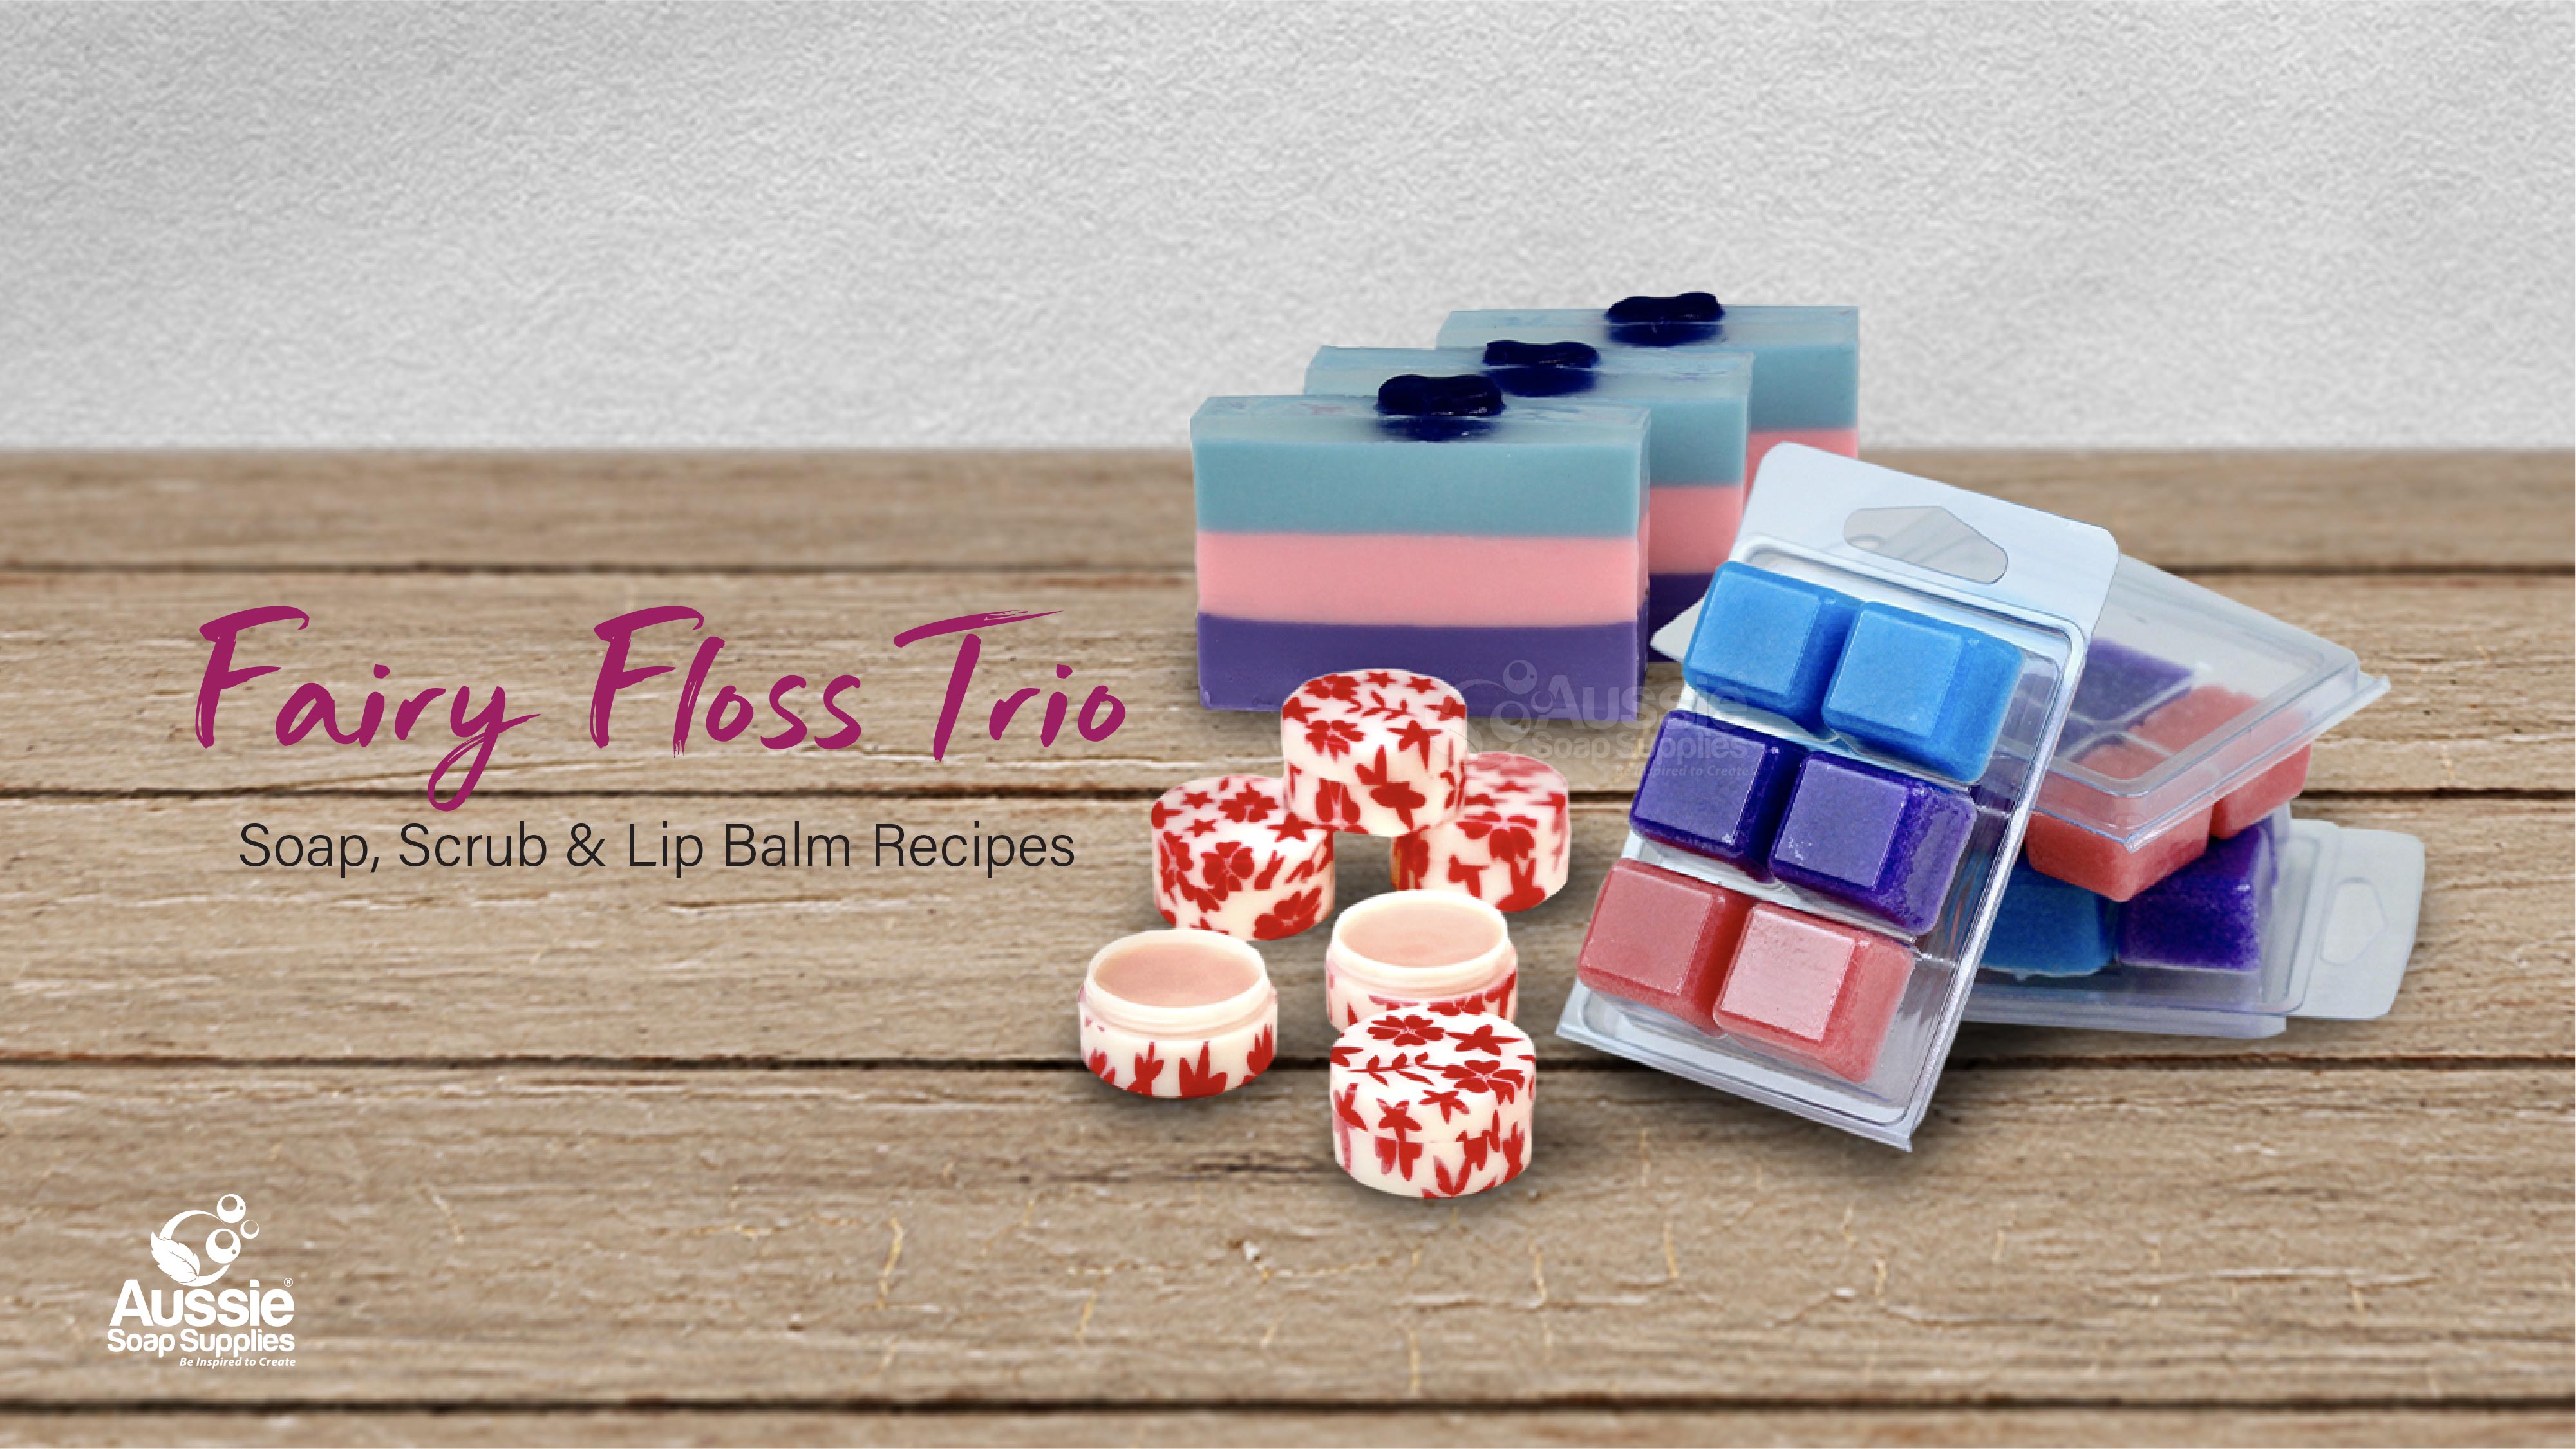
This collection of 3 Fairy Floss (Cotton Candy) themed products is part of our 2016 Christmas donation to the Women’s Council for Domestic Violence. We like to do this every year so that women who are in a safe refuge at this time have something lovely to wake up to Christmas morning.

You can purchase these ingredients as a "Trolley Items Set" on this Page
What you need:
- 1410g SFIC White Melt & Pour Soap Base (or other opaque base as below) cut into cubes
- 250g SFIC Clear Melt & Pour Soap Base
- 27g/ml Cotton Candy Floss Fragrance
- Pink Piggy Colour Block
- Persian Blue Colour Block
- Royal Purple Liquid Pigment Dispersion
- Flexible Column Embed Mould - Heart *This mould has replaced the small Mini Hearts Mould
- Flexible Mould - Loaf (Regular)
- Pipettes
Other Melt and Pour Soap Base Options:
Stephenson Crystal WST Melt & Pour Soap Base
Stephenson Crystal ST Melt & Pour Soap Base
Palm Free and Vegan*: *Increase pour temperature to 70°C
Palm Free RC Melt & Pour Soap Base
Palm Free Mango Butter Melt & Pour Soap Base
Equipment:
3 microwave safe jugs - Each needs to hold 750ml or (1 x 750ml jug and reuse it) or a crockpot if you prefer to melt the soap in one batch
1 x small jug, to hold 1 tablespoon or so
Stirring spoons or spatulas
Electronic scales to ensure you have even layers
Isopropyl Alcohol in a Spritzer Bottle - For spritzing the layers to ensure they "stick" together
1 x small toothpick or skewer
I like my fragrance fairly rich, so for Melt & Pour I tend to use a medium recommendation and I have fragranced this loaf with 9g/ml in each of the coloured layers, though it is a light scent, so you could use more. Colouring, I used 12- 15 drops of Royal Purple in the base layer, and a good shaving of Pink Piggy Colour Block in the in the middle and a good depth of Persian Blue in the final layer. I used no fragrance in the heart embeds, and no fragrance or colour in the clear layer that secures the embed hearts in place on top.
Prep:
- Set out ingredients and equipment.
- Dice the soap bases keeping the white separate from the clear base
Step One: Make the embed hearts – I like to make these ahead of time or during the process of making the log, do whichever suits you!
Please Note: The original embed mould is no longer available, we recommend using the Flexible Column Embed Mould - Heart and slice the hearts ready to embed
- Place 150g clear soap base into a small jug and melt in the microwave in 20 second bursts until it is liquid – don’t let it boil! It is really easy to overheat this small amount of soap.
- Place the column mould into a large heavy based jug or vase so that it is easier to pour and can set up.
- Colour this soap to a dark shade of purple and then pour into the mini mould.
- Set aside and leave to cool and set up. This will take about 30 - 60 minutes or so, depending on how hot you poured.
- Once completely set, peel back the mould and slice the hearts into half cm slices (approx).

Step Two: Make the three layer soap loaf
- Divide the white soap base into three portions of 470g – if you are using 3 jugs, place a portion in each.
- Cover the first jug and heat in the microwave – heat in bursts of 15 – 30 seconds until melted.
- Check the temperature to avoid overheating – most bases don’t need to be heated above 70°C.
- Remove from the microwave and colour to a medium shade of purple.
- Add 9g/ml of the fragrance to this jug and stir well to combine.
- Spray with Isopropyl Alcohol if any surface bubbles appear.
- Pour when the soap is around 55 - 60°C (depending on which base you are using).
- Spritz with Isopropyl Alcohol to remove any surface bubbles.


- Allow 15 minutes or so to set up whilst you prepare the next pour.
- Repeat the above process using the pink colour and another third of the fragrance.
- Test the soap loaf for firmness by gently pressing with your fingertips.
- When it’s firm enough to support the next layer, spritz the surface of the soap again with alcohol (this “glues” the layers together).
- Carefully pour the pink soap over the surface of the purple layer – if you are concerned about “breaking through the surface” of the purple layer, pour over the back of a spatula or spoon.


- Allow 15 minutes or so to set up whilst you prepare the final pour.
- Repeat the above process using the blue colour and the final third of the fragrance.
- Test the soap loaf for firmness by gently pressing with your fingertips.
- When it’s firm enough to support this layer, spritz the surface of the soap again with alcohol.
- Carefully pour the blue soap over the surface of the pink layer – if you are concerned about “breaking through the surface” use the spatula to pour as previously.
- Allow to set up for at least 30 minutes or so.

- Complete making the heart embeds – I use the width of the hearts to be my guide for cutting, so when placing on the soap allow a millimetre or so for the cutter blade or knife to slide down.
Step Three: Embed the hearts on the top of the loaf

- Melt 150 - 200g of soap clear soap base.
- Spritz the surface of the soap generously with Isopropyl Alcohol.
- Arrange the heart embeds in a single line down the centre.
- Spritz the hearts and soap again, then carefully pour the clear liquid soap around the hearts, moving down the loaf as you go so it doesn’t set up. This layer is about ½ to ¼ cm deep. It only needs to be deep enough to hold the embeds in place.
- Give a quick spritz with alcohol and allow to set up completely for several hours or overnight.

- Unmould by pulling the sides from the long, silicone mould to release the air lock, and push thumbs along the base and soap loaf will slowly fall down onto the bench.
- Using the gap between the hearts as a guide, cut into slices.
- Allow a day or two to firm up and then wrap!
You can purchase these ingredients as a "Trolley Items Set" on this Page

You can purchase these ingredients as a "Trolley Items Set" on this Page
Single use Sugar Scrub Cubes are very popular, and this recipe is a snap to make! You can use regular white sugar, or if you prefer a smoother scrub, select Caster Sugar. You will have a smoother product with the caster sugar but will use more of it. The more sugar you add, the stiffer the mixture will be. You can pour these using less sugar, which is easiest when using tart moulds.
Solid Sugar Cubes are easy to make, require no preservative as they don’t contain any water based ingredients, and these contain Apricot Kernel Oil and Cocoa Butter which are just great for your skin.
This project forms part of our Fairy Floss Trio - Melt and Pour Soap, Lip Balm and these cubes. If you are making all three projects some ingredients are used in more than one project, so you can purchase all the bundle ingredients you need from the Fairy Floss Trio Tutorial Page.
To make one full batch for 10 tart moulds:
- 270g Clear Melt & Pour Soap Base
- 130g Apricot Kernel Oil (or your preferred fixed oil)
- 85g Glycerine PF Vegetable
- 45g Cocoa Butter
- 8 - 15g/ml Cotton Candy Floss Fragrance
- Astral Blue Mica
- Royal Purple Liquid Pigment Dispersion
- Pink Raspberry Mica
- 400 - 450g White Sugar, either caster or regular (finer or regular for coarser scrub)
- 1 x 10 Pack Clamshell Tart Moulds
For 3 different colour, single pour batches, each batch needs:
If you prefer to make smaller single colour batches as I have done, each colour needs:
90g Clear Melt & Pour Soap Base
35 - 40g Apricot Kernel Oil (or your preferred fixed oil)
28 - 30g Glycerine PF Vegetable
15g Cocoa Butter
2.5 - 4g/ml Cotton Candy Floss Fragrance
160 -180g White Sugar, either caster or regular (finer or regular for a coarser scrub)
Equipment:
- 1 - 3 x Heat proof microwave jugs, plastic or Pyrex, approximately 500ml volume
- Pot Mitt if using Pyrex – PYREX GETS HOT in the microwave, take care when removing jug
- Spatulas
- Spoons
- Paper towels etc
- Disposable Pipettes
TIP: By using white sugar you will keep clean, fresh colours, if you want to use raw or unrefined caster sugar the colour will be affected.
Colour Info: This product contains some water based ingredients and some oil based ingredients. If you are using micas, you can add them anytime before the sugar. If you are using the colourants specified they will be more miscible in the heated Melt & Pour Soap and glycerine. If you are switching to oil based colourants they need to be added to the oils. See below for the methods.

Method (for making 3 smaller batches):
- Prepare work surface, equipment and assemble ingredients.
- Set the sugar aside.
- In a microwave jug place the Cocoa Butter and Apricot Kernel Oil and heat on high until melted – this will only take a minute or two – take care not to over heat or boil.
- Once melted, remove from the microwave.
- Dice the Melt and Pour Soap Base and place in another jug with the Glycerine PF and heat in the microwave in short bursts until melted.

Now Colour:
- If using liquid colours, colour the melted soap base and glycerine to a rich, deep colour.
- If using Powdered Lake Dyes or Oil Soluble Powdered Dyes, add to the melted oil and Cocoa Butter.
- If using micas to colour, you can add these to the mixture once combined or moisten with a little oil first.
We are using the following
- For the blue: Astral Blue Mica (we previously used a liquid blue). Add to the melted soap base and glycerine, stir well and then combine with the liquid oil and Cocoa Butter.
- For the purple: Royal Purple Liquid Pigment Dispersion. Add to the melted soap base stir well and then combine with the liquid oil and Cocoa Butter.
- For the pink: Pink Raspberry Mica. Combine the melted cocoa butter and oil with the glycerine and melted soap base, then add the mica powder.
- Begin with the blue batch, making as described above,
- Once the colour, soap and oils are well combined, add 2.5 - 4g/ml Cotton Candy Fragrance and stir well.


- Next begin adding sugar – up to 180g for the ⅓ batch size. Begin by adding half and stir, the mixture should be sloppy but not completely liquid. Continue adding until you get a medium pourable consistency. Remember, you can control the thickness, less sugar = smoother cubes, more sugar = more substantial scrubs!

- Pour into 2 of the cavities of each tart mould.
- Now repeat with jug two and the purple colourant. Do exactly as with the first batch.
- After this, for the third, pink batch, you can combine all the ingredients and then add the colour, or to either of the jugs. Proceed after this as previously.
- If making these in very hot weather, pop them into the freezer for a few minutes to firm them up more quickly.
- Once they are completely cold and set up seal the lids down and label.
You can purchase these ingredients as a "Trolley Items Set" on this Page

This is a yummy, quick and easy Lip Balm that is included in our trio Fairy Floss Set here.
I do not normally use our microwave safe 100g Lip Balm containers straight into the microwave, but as I knew I wanted 10 – 12 pots it saves on washing up! The quantity you make depends on how full you make the pots. This balm is quite firm as I have not added any extra liquid oil – basically it’s Western Australia, it’s summer, so this is going to be a whole lot softer until we reach next autumn.
PLEASE USE GREAT CAUTION IF YOU ARE melting the balm this way, if in doubt place the balm into a jug as usual.
This tutorial is also on a single page here
What you need:
- 100g Lip Balm Base (I used Nourishing, Vegan)
- 10 -15 drops Cotton Candy Lip Flavour
- 10 -15 drops Sweet Lips Sweetener
- 1/8 teaspoon Pink Raspberry Mica
- 10 – 12 Blossoms Lip Pots Style # 1
- Pipette or dropper
- 2 small coffee stirrers or similar
- Thermometer is handy, but not essential
Tip: Testing for taste is really important! I use the “toffee” method, ie a cold metal spoon, drip one or two drops of lip balm onto the cold spoon, check it’s cool to touch, and then have a taste. You’ll know if you prefer a little more flavour and sweetener and adjust to your preference.

Instructions:
- Remove the lid from the tub of lip balm and place in microwave on medium/high and melt in bursts of 30 seconds, take care not to over heat it. If you have a thermometer I like to melt to 75°C and pour at 70°C or just below.
- Once you see there is only a small piece of balm floating in the liquid, remove from the heat and gently stir until this melts.
- Now add the Lip Safe Mica, and stir to ensure there are no dry spots.

- Add 10 drops each of Sweet Lips Sweetener and Cotton Candy Flavour and stir well. If the balm is cooling and the oils begin setting up, just give it a gentle re-melt in the microwave for 10 seconds.

- Pour time! If you are using the original container, you can actually give it a GENTLE squeeze to form a bit of a lip, and then pour directly into the lip pots. I like mine filled just shy of the rim.

- Allow to set up, put on the lids, label or bag, and you are done!
| Difficulty: | Beginner |
| Yields: | 10 sets of 3 products |
| Time: | 3 hours for all 3 projects |


