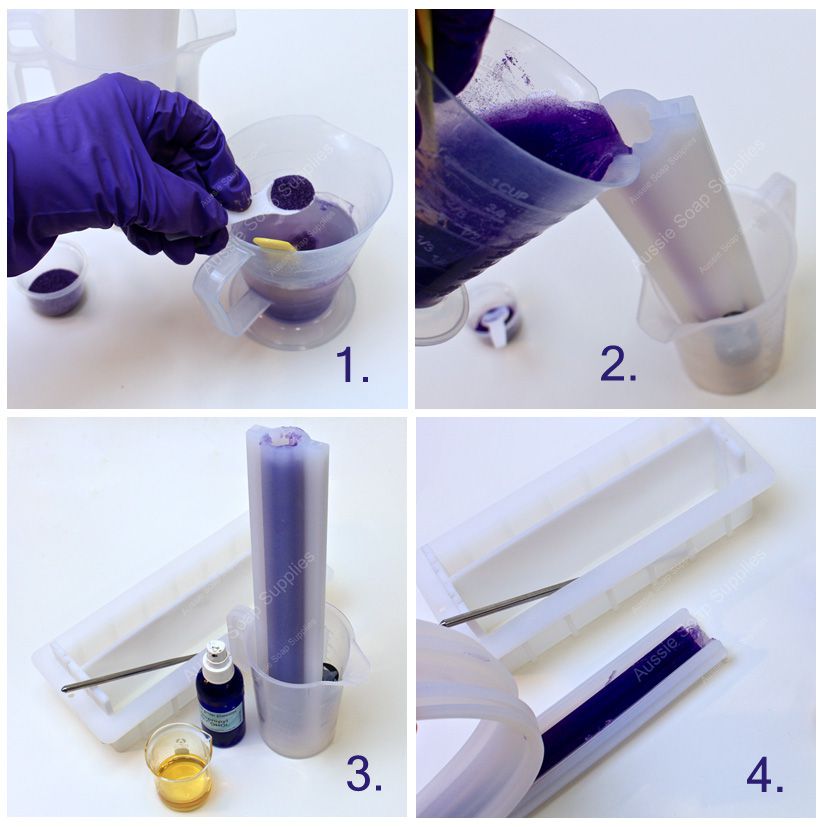
This beautifully scented soap is swirled in the mould, which is trickier with Melt & Pour Soap than with Cold Processed Soap as the temperature is crucial to getting the soap to swirl together, but stay distinctly two colours.
If you are switching to our Palm Free Melt & Pour Soap Bases increase the temperature of the soap. The opaque Palm Free Base soap base is melted to 75°C and poured at 70°C ish, the Crystal NS & WNS is poured at 55 - 60°C. *Note this soap was previously made with White Rose Fragrance, which has now been deleted, and our new Night Violet Fragrance suits the design perfectly!
What you need:
- 1kg Stephenson NS Crystal Soap Base
- 1kg Stephenson WNS Crystal Soap Base
- Royal Purple Liquid Pigment Dispersion – qs to colour the soap to a rich, deep purple tone
or - Galactic Purple Mica
- 25g/ml Night Violet Fragrance (or your preferred Essential Oil)
- ½ teaspoon Purple Fine Glitter - if available to sprinkle on the top of the finished loaf
- Isopropyl Alcohol and Blue Spritz Bottle
- Daisy Embed Mould
- Flexible Mould - Loaf (Regular)
- Multi Pour Sectioning Tool for Silicone Loaf Mould (Dividers Set)
Equipment:
2 x 1 litre microwave safe jugs (or Pyrex)
250ml microwave safe jug (or Pyrex)
Spatula, stirring sticks or spoons, a chopstick
Thermometer - helpful but not essential
Digital Scales
A knife or Soap Cutter Blade to slice
Disposable Pipette
Step One - Prep and Embeds
Assemble the column embed mould and the sectioning tool in the loaf mould.
Put the end pieces of the sectioning tool in the mould with the 4 slots facing inwards. Insert one vertical divider and lock it down in the centre slot
Dice all the soap bases into 1 - 2cm cubes - keeping the clear and the white separate
Make the purple embed flower cylinder (this can be made ahead)
- Place 130 -150g diced Crystal NS (Clear) Soap Base into the smaller jug and cover, then melt in the microwave until liquid, watch carefully to avoid boiling – it's best to melt in short bursts and stir between the bursts of heating.
- Add a few drops Royal Purple Liquid Pigment Dispersion and half a teaspoon of Purple Pixie Glitter (if using) and stir well to combine.
- Add 3g/ml White Rose Fragrance and stir well to combine.
- Spritz away any surface bubbles with Isopropyl Alcohol.
- Seal the mould and stand it in a tall vessel that can support the column leaning against the side when filled with soap.
- When the temperature of the soap is around 56 - 60°C, carefully pour into the embed mould and allow to set up.

Instructions for Main Loaf:
Step Two - Main Pour: Prepare everything for the double soap pour and swirling.

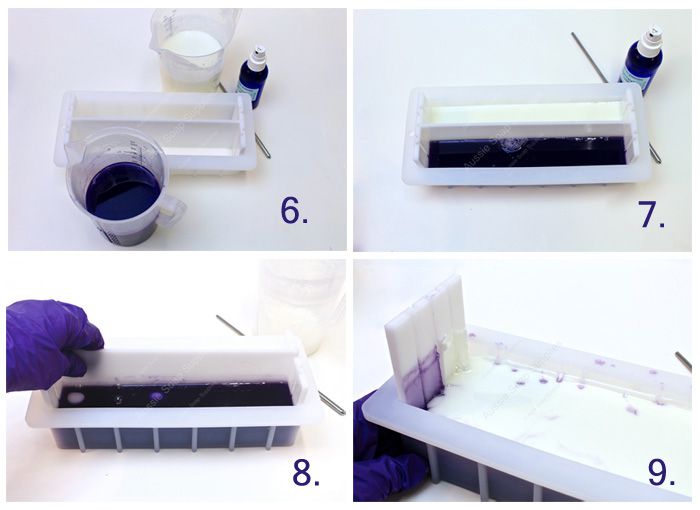
- Place 650g NS Crystal (Clear) soap into one of the larger jugs, and 650g WNS Crystal (White) base into the other large jug.
- Place the jugs in the microwave, covering with a piece of cardboard or similar. Heat in bursts until the soap is liquid.
- Remove the soap jugs from microwave, stir and spritz with alcohol to remove any bubbles.
- Into the clear soap base, add sufficient drops Royal Purple Liquid Pigment Dispersion to colour to a dark shade (I used around 10 - 15).
- Add half of the remaining White Rose Fragrance to each jug and stir well.
- Check the temperature - pour the soap at close to 55°C to achieve a good swirl pattern.
- Have everything you need to hand, the chopstick, alcohol soap etc.

- Time to pour! The two colours are poured simultaneously, one on either side of the divider.
- Take a jug in each hand and carefully pour the white and the purple soaps approximately half way on each side of the divider.
- As the soap settles you'll see only a small amount of soap may seep under the divider (if you pour all at once a lot of soap can seep through).
- Then top up with the same colours, using all of the soap in the jugs.
- Carefully test the centre divider to see if it will easily pull free. If it does, great, remove it and then the two ends.
- However, it it won't come free easily, carefully remove one of the end slats, and then remove the other end piece and the centre divider together.
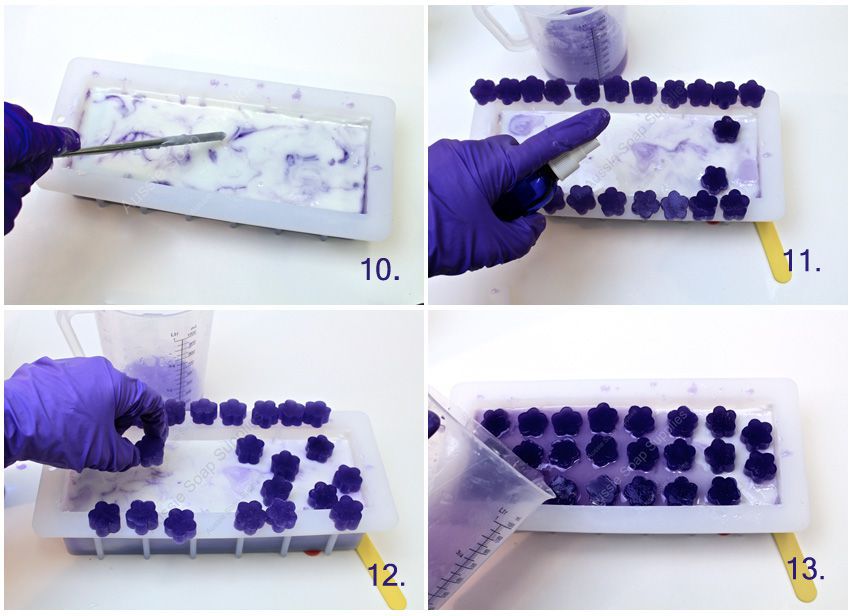
- The soap is ready to swirl - use the chop stick to make swirls through the two colours in a circular motion. You can take the chopstick around the perimeter of the mould if you like that effect, but as you can see from the pictures, I didn't for this one! Tip: Don't overdo the swirling so you keep nice distinct colours.
- Spritz with alcohol and allow to set up.

Step Three - Finishing - Embeds and overpour
- While this is setting up, unmould and slice the daisy embed column - the slices should be around 0.5 cm thick.
- Place 150g clear soap base into the small jug.
- When the soap in the mould is firm to the touch it's time to arrange the flower soap embeds on the surface of the soap. The embeds can get a little slippery when sprayed with the alcohol so I arrange them on the top edges of the mould, spritz the surface of the soap generously with Isopropyl Alcohol and then place in rows so that the soap cutter or knife easily fits between the rows.
- Melt this overpour soap base in the small jug, I added just 1 drop of Royal Purple as the surface of my loaf was mainly white.
- Spray the embeds again and then carefully pour the soap around the embed daisies securing them in place.
- A quick spritz with alcohol and it's finished.

-
Leave to set up completely, overnight if possible, and then take the Cutter Blade (and guide if you have one) or knife and slice into 8 soap bars - you can use the rows between the daisies as a cutting guide.
| Difficulty: | Intermediate |
| Yields: | 8 - 12 bars |
| Time: | 1½ hours (using pre-made embed) |
| sale: | No |
| save: | No |


